ArtyScout Posted April 4, 2020 Share #1 Posted April 4, 2020 I've started my next diorama. It's titled "The Race to the Channel". It depicts the Rommel's 7th Pz. Division under as it races toward Dunkirk in 1940. The first part I've made is the BMW motorcycle. I still have to add the MG-34 machine gun and the soldiers and also to add some weathering. As always all comments and critiques are welcome. Semper Fi. Manny Link to comment Share on other sites More sharing options...
Proud Kraut Posted April 4, 2020 Share #2 Posted April 4, 2020 Looking forward to another project. Your "Krad" looks good so far! Is it the Tamiya or Italeri kit? P.S.: Very realistic leather color on the seat and the side bag! Link to comment Share on other sites More sharing options...
ArtyScout Posted April 7, 2020 Author Share #3 Posted April 7, 2020 Hey Lars, this is the Tamiya kit and I'm using their figures too. I had to readjust the spare tire. I don't know how it moved forward but it came out OK. Here are some more pics with the MG 34 side car soldier. I'm finishing up the motorcyclist now. Semper Fi. Manny Link to comment Share on other sites More sharing options...
Proud Kraut Posted April 7, 2020 Share #4 Posted April 7, 2020 Yeah, the 100 years old Tamiya kit.,I have built several of these as well. No longer state of the art concerning the details but yours looks pretty good. There are two more walking soldiers with it, right? Link to comment Share on other sites More sharing options...
ArtyScout Posted April 7, 2020 Author Share #5 Posted April 7, 2020 Hahaha, "100 years old kits", that's funny, but you're right because I remember my StuG III was a very old (1973) kit. Well I doubt that I'll be using the two walking soldiers. A Pz III ausf E from Dragon is also in the works along with; YES, Tamiya Pz. Grenadiers, MiniArt tank crew and houses, plus other knicknacks. This should take up a lot of my time. I'm following that Heinkel. Be safe. Semper Fi. Manny Link to comment Share on other sites More sharing options...
ArtyScout Posted April 8, 2020 Author Share #6 Posted April 8, 2020 Well I finally finished the motorcycle driver. Now to move on to the Pz III ausf E. Semper Fi. Manny Link to comment Share on other sites More sharing options...
Proud Kraut Posted April 8, 2020 Share #7 Posted April 8, 2020 Realistic colors, very well weathered, nice! I suspect the Karabiner 98 will still get a belt, right? Looking forward to see the progress of the Dragon Pz III. Lars Link to comment Share on other sites More sharing options...
Tony v Posted April 8, 2020 Share #8 Posted April 8, 2020 Manny Wonderful work! Looking forward to seeing the finish work. Thank you Tony Link to comment Share on other sites More sharing options...
ArtyScout Posted April 9, 2020 Author Share #9 Posted April 9, 2020 Realistic colors, very well weathered, nice! I suspect the Karabiner 98 will still get a belt, right? Looking forward to see the progress of the Dragon Pz III. Lars Hey Lars, now if you've built some of these, you know that Tamiya made the Kar 98's belt molded to the cyclist. I know that the belt goes from the stock to the leading end of the fore end stock. I'll probably tweak it later, but for now, I'm going to move forward with the work. Besides I've been looking forward to doing this Pz III for awhile. lol. Semper Fi. Manny Link to comment Share on other sites More sharing options...
ArtyScout Posted April 16, 2020 Author Share #10 Posted April 16, 2020 With World Militaria being upgraded I haven't been able to put up updates. The site looks cleaner. Well here go a couple of pics of the lower hull and individual track links. I'll post more later. Semper Fi. Manny Link to comment Share on other sites More sharing options...
ArtyScout Posted April 16, 2020 Author Share #11 Posted April 16, 2020 Having some problems posting pics. Link to comment Share on other sites More sharing options...
Proud Kraut Posted April 16, 2020 Share #12 Posted April 16, 2020 Good to have you back again here, Manny. Your Pz III chassis looks great! Are these metal tracks or are the plastic tracks already painted? P.S. I have some problems as well posting pics when I`m posting several posts in sequence. My workaround is to refresh the site after each post. It works. Link to comment Share on other sites More sharing options...
mikie Posted April 17, 2020 Share #13 Posted April 17, 2020 Beautiful work, Manny! keep the posts coming! Mikie Link to comment Share on other sites More sharing options...
ArtyScout Posted April 18, 2020 Author Share #14 Posted April 18, 2020 I've done some more work as I've added the upper hull and fenders and painted the tools and accessories separately. Now to painting the upper hull and putting things in their places. Semper Fi. Manny Link to comment Share on other sites More sharing options...
Proud Kraut Posted April 18, 2020 Share #15 Posted April 18, 2020 Very nice! I don´t know if you mentioned it allready. Are you using an airbrush or Panzergrau spraycans? Link to comment Share on other sites More sharing options...
ArtyScout Posted April 19, 2020 Author Share #16 Posted April 19, 2020 Hey everyone. Lars as to your previous question, the tracks I used came with the kit. They are plastic individual links; and I use Badger airbrushes with a small commercial air compressor (with air gauges) in which I added a moisture trap, and I've attached 4 airbrushes to it. So far I have no complaints. I've finished(?) the hull, so now onto the turret. Of course I'll be tweaking as I go along. Semper Fi. Manny Link to comment Share on other sites More sharing options...
Proud Kraut Posted April 19, 2020 Share #17 Posted April 19, 2020 The tank´s hull looks perfect so far. One point, please check the color of the fire extinguisher. As far as I recall the ones that were carried outside at tanks were grey, later sand yellow but not red. Same with the jacks, grey later sand yellow. Link to comment Share on other sites More sharing options...
ArtyScout Posted April 19, 2020 Author Share #18 Posted April 19, 2020 Thanks Lars, this is what happens when you follow Dragon's color chart. I should have just followed my reference pics. Which I will from now on. Like I said I might have to tweak something. No problem. Semper Fi. Manny Link to comment Share on other sites More sharing options...
ArtyScout Posted April 20, 2020 Author Share #19 Posted April 20, 2020 Well I took Lars' advice. The fire extinguisher got an "in field" grey repainting and I colored the jack with 'Gunmetal' paint. It still retained some of the steel undercoating. But I'm quite happy with it. Besides when the weathering begins things will look a little different. Now I've started on the turret. The commander's cupola was a bit touch n go, but I got it done. Pretty soon the decals(transfers) will make their way unto the vehicle. Semper Fi. Manny Link to comment Share on other sites More sharing options...
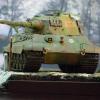
ArtyScout Posted April 22, 2020 Author Share #20 Posted April 22, 2020 "What we have here, is a 'very clean' Pz III ausf E" lol. Yes this tank is clean. Now its off to weathering, dirtying and all the little tweaking that goes into making it a tank in battle. I also have the crew figures to do that will go into the hatches of this tank. As always any comments or critiques are greatly appreciated. Be safe, stay safe. Semper Fi. Manny Link to comment Share on other sites More sharing options...
Proud Kraut Posted April 22, 2020 Share #21 Posted April 22, 2020 I wasn´t aware of the fact that the "E" variant´s turret was equipped with two machine guns on the right side of the 5 cm cannon, very cool! Your tank looks awesome, an excellent paint job so far. I´m curious how you´ll paint the tracks. Looking forward to see this fine tank weathered. Lars Link to comment Share on other sites More sharing options...
ArtyScout Posted April 22, 2020 Author Share #22 Posted April 22, 2020 2 hours ago, Proud Kraut said: I wasn´t aware of the fact that the "E" variant´s turret was equipped with two machine guns on the right side of the 5 cm cannon, very cool! Your tank looks awesome, an excellent paint job so far. I´m curious how you´ll paint the tracks. Looking forward to see this fine tank weathered. Lars Yes I was surprised to find out that the early "E" variants had the 2 machine guns but the main gun was a (37mm kwk 36) gun. The latter "E" and early "F" variants were upgunned with the (50mm kwk L42) gun because they rudely discovered that their 37mm guns could not penetrate the Matilda's heavy armour when they encountered them at Arras, France as the BEF tried to counterattack the flanks of Rommel's 7th Pz. Division and Guderian's 16 Army Corps. As for the tracks, theyare already painted in MM's Steel color, I'll darken them some, add weathering, some rust and dirt and hopefully they'll look fine. QUESTION: Is the US Militaria Forum getting an upgrade too. Seems like I can't get on. If so, very good. Semper Fi. Manny Link to comment Share on other sites More sharing options...
mikie Posted April 23, 2020 Share #23 Posted April 23, 2020 Hi Manny. Your tank is awesome! I'm enjoying watching your build. And yes, USMF is getting it's upgrade now. I've been going into withdrawal for most of the day. Mikie Link to comment Share on other sites More sharing options...
ArtyScout Posted April 24, 2020 Author Share #24 Posted April 24, 2020 Well I decided to go halfway on the weathering of the Pz. III. I used a black oil pin wash on the front and rear deck hatches, then I used a raw umber oil wash on the suspension and the tracks, followed by a complete tank dry brushing, to give it that hint of metal. I decided that the rest of the rust, dirt and any other weathering will come when I start the diorama and decide what the dirt color will be. Sometimes the camera doesn't capture all the work but it was worth it. Now I can start on the tank crew figures. Semper Fi. Manny Link to comment Share on other sites More sharing options...
Proud Kraut Posted April 24, 2020 Share #25 Posted April 24, 2020 Top-notch weathering! The oil color wash really gives it the "metal look". Link to comment Share on other sites More sharing options...

Recommended Posts
Create an account or sign in to comment
You need to be a member in order to leave a comment
Create an account
Sign up for a new account in our community. It's easy!
Register a new accountSign in
Already have an account? Sign in here.
Sign In Now